Given that you can’t always count on an armorer to be present, willing and able to do that wiring job for you, it’s a good idea to learn how to take care of it yourself. Fortunately, there’s a little secret that we armorers sometimes don’t bother to reveal to the general public: the basic tasks of assembling and maintaining fencing weapons really are not terribly difficult.
There are an awful lot of constant facts of existence when it comes to fencing:
- There’s no substitute for lots of repetitions to get technique right.
- You are going to have ‘on’ days when you feel like you could beat anyone, and ‘off’ days when you wonder why you bother with this instead of staying home and watching Stargate SG-1 reruns.
- You are going to have a referee blow a call against you at 14-14 at some point in your life.
- You can never do too much footwork practice.
- At some point, you will have a blade that needs to be wired (unless, of course, you are exclusively a sabre fencer—if so you can stop right here and go dig out those Stargate tapes).
Given that you can’t always count on an armorer to be present, willing and able to do that wiring job for you, it’s a good idea to learn how to take care of it yourself. Fortunately, there’s a little secret that we armorers sometimes don’t bother to reveal to the general public: the basic tasks of assembling and maintaining fencing weapons really aren’t terribly difficult. With a handful of tools (many of which you probably already have) you can get the job done, even if you think of yourself as having no technical aptitude whatsoever. The great majority of the stuff you see armorers carrying about in our toolcases, and the tricks and trivia we have squirreled away in our heads, are really just labor-saving devices that speed up taking care of large quantities of equipment.
This is a guide to carrying out the task of preparing, wiring, and assembling foils and epees. It’s not the first one written by any means—if you talk to a number of experienced armorers, you’ll find that all have their own, slightly different methods and tricks. The basics, though, are going to be the same no matter who is giving you advice. If you’re just starting out, the best way to ensure that you succeed is to take things slowly—even the best armorers can tell you about times when they bollixed things up by rushing to get a weapon ready. I’ll point out the most common ‘gotchas’ as they come up.
 Always have the proper safety signs by your workbench.
Tools
The essential tools and supplies for wiring blades are:
- Pliers or vise grips
- Utility knife
- Small (Jeweler’s) screwdriver for point
- Jig for bending blades (more below on this)
- Point setting tool (a small bolt, Q-tip shaft, or something similar can substitute)
- Tip tape
- Wire
- Complete point (if rewiring a blade, the old point parts can be re-used if they’re in decent condition).
- Insulation tubing
- Glue (more below on what types can be used)
- Fine-grit sandpaper and Scotch-brite pad
- Electrical tester (Ohmmeter is preferable, an LED test box will suffice)
- Test weight and shims
- Paper towels or rags
Other useful tools or supplies are:
- Vise to hold blade
- Sanding sponge or abrading block
- Hand-removable threadlocker (e.g., Loctite Blue)
- Dremel tool with cut-off wheels and wire wheel
- Acetone bath
- Acetone, nail polish remover, or super-glue remover gel
- Small diameter (30 gauge) wire stripper (Micro-Mark sells one)
- Bench grinder with grinding wheel and wire wheel
- Flat bastard file
- Set of riffler files
- Plastic dish scraper or putty knife (to seat the wire in the groove without damaging the insulation)
Detailing the Items you’ll be using:
A little more detail on some of these items and their use:
Jigs
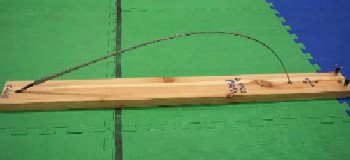
A jig is a device that holds a blade bent while it is being wired and while the glue is drying. A non-portable jig can be made from a length of board by drilling an angled hole at one end for the tang to fit in and several angled holes at the other end, spaced between 60-70 cm from the tang-hole, for the point. The multiple holes for the point are there to accommodate different blade lengths, tang lengths, and different amounts of bend.
A portable jig can be made from a ~75 cm length of lightweight chain and pair of small copper pipe end-caps. Punch or drill a hole near the edge of the caps, bend open the link at each end of the chain and hook it through the hole in one of the caps, and then bend it shut. If you remove one link from the chain before attaching the pipe caps, you can loop it through one of the other links and bend the free end open to make a hook. You can then shorten the effective length of the chain by placing the hook through another link further down.
There are a variety of other materials that can be used to make jigs. I’ve seen plastic film canisters tied together with strings, and even one made using a couple of spent 7.62 mm x 39 (i.e., AK-47) cartridges.


Acetone bath

Removing the existing wire and glue from the groove is the toughest, most tedious task in re-wiring a blade. An acetone bath will eliminate the bulk of the labor associated with stripping out the wire and glue. It is simply a standpipe filled with acetone into which you place the blade—the acetone will dissolve the glue, leaving a loose wire and a clean groove. The materials needed to make an acetone bath are a 3-foot (1 m) length of black pipe (1 ½ in or 4 cm diameter or greater) threaded at both ends, a 4-in end-threaded length of the same pipe, a threaded pipe connector, two threaded end-caps, and a tube of pipe-thread compound. All these items, as well as acetone, can be found on the shelf at a home-improvement or hardware store.
Before screwing on the cap that will be the bottom of the standpipe, apply thread compound to the threading of the pipe. This will make a liquid-tight seal and prevent acetone from leaking out. The 4-inch length of pipe, connector, and other end cap are assembled to form an extended cap that will screw on over blade tangs. Once the thread compound has cured, the pipe can be filled with acetone (a funnel is advisable to avoid spills). You want to leave the level low enough to account for the displacement of the blades when they are inserted (otherwise you’ll get acetone spilling out when you first drop a blade in). It can be useful to have one or two ‘junk’ blades on hand that you can use as ballast when stripping only a single blade.
Acetone is easily as flammable as gasoline and even more volatile, so care needs to be taken to avoid spills and not leave any quantity open to air for long. Make sure you apply enough thread compound to prevent any leakage from the bottom of the standpipe, and keep the cap on except when inserting or removing blades.
After a sufficient period of use, the concentration of dissolved glue in the standpipe will become great enough that you will need to drain and replace the acetone. While a home user can get a somewhat overly alarming picture of acetone’s chemical toxicity from reading the Materials Safety Data Sheet (keep in mind that the MSDS is intended to encompass handling of mass quantities in an industrial environment), used acetone should definitely not be poured down the drain. Empty the old acetone into a suitable, sealable metal or glass container (NOT plastic- acetone will dissolve it), and check with your municipality to find out where household chemicals may be taken for safe disposal.
Dremel Tool

If you glance into the toolcase of any armorer working at a NAC or National Championships, you are almost certain to spot a Dremel tool and a supply of cut-off wheels. There are a variety of uses for Dremels and the assorted bits available for them in the armory. The cut-off wheel is of particular utility in stripping out wires and glue from blades: it happens to be just the right width to fit neatly into a blade groove and scour it clean. Ideally, you’ll have been able to pull the wire out by hand, so you’ll just need to clean the residual glue out of the groove. If you can’t get the wire out, then you will be able to grind it away with the Dremel, though it will take more time.
There are some safety issues to take into consideration. Between the bits of glue, wire, and dust from the cut-off wheel flying off, as well as the possibility of the wheel breaking in use, it is absolutely essential to wear eye-protection. Also be forewarned that some types of glue can give off fumes when abraded away, so good ventilation is your work area is also advisable.
To clean out the groove, you want to clamp the blade flat. Inspect the cut-off wheel to make sure it is in good shape—they’re a consumable item, and if worn too much you’ll want to put a fresh one on the mandrel. Put your eye-protection on, and you’re ready to start. Run the cut-off wheel along the groove—make several passes while applying light pressure (pressing down hard will tend to break the wheel, and isn’t how Dremels are designed to be used to begin with). Keep making passes until the groove is scoured down to bare metal. It may be easier to work the groove in sections, rather than running down the whole length of the groove.
Glues
Anybody who spends much effort insisting that the particular glue they use to wire blades is the only one that will work properly is a) wrong, and b) probably in need of a life. So long as you’ve cleaned and prepared the blade well, just about any reasonable choice of glue (i.e., not paper or wood glues) will work fine. For the purpose of this how-to manual, I’m going to broadly divide glues into two categories: slow curing and fast curing.
Slow curing glues include general-purpose cements (Duco, Cementit, Pliobond, etc.), specialty cements (such as fletching cement), and epoxies. What they have in common is that they require at least several hours (if not a full day) to cure, and they typically have a higher viscosity. These glues can be more forgiving to work with, since you have plenty of time to re-position or re-tension the wire before they solidify and, unless you are prone to prolonged episodes of narcolepsy, you shouldn’t be at risk of gluing your fingers to the blade. Their viscosity means they won’t run where you don’t want them to. They also tend to retain more flexibility when cured. For beginners, I think a general-purpose cement is the best choice. Fletch-Tite, a fletching cement, has many qualities which work well for wiring blades (including remaining flexible when cured) but puts of a great deal of fumes when curing, requiring a well-ventilated work area.
Fast curing glues are cyanoacrylates, a.k.a. superglues. They include the normal brands you’ll find at hardware and drug stores, and specialty brands like Pacer Zap and others, which are available from hobby supply stores. They all cure in a matter of seconds, which allows the blade to be used almost immediately, and have a low viscosity which allows them to easily flow in the groove. The curing time and fluidity do require some consideration when wiring, however. The specialty superglues are available in a different viscosities, ranging from almost water-thin, instant-cure glues (e.g. Zap CA) which dry in less than 5 seconds, to somewhat thicker ones which are better at filling in gaps. Fast cure glues tend to be more brittle when cured, although there is one formulation available (Pacer Flex-Zap) which has greater flexibility when cured. I myself use Zap CA for the majority of my wiring jobs.
Preparing the Blade and Parts
There are a few steps to take with a blade before actually gluing the wire in- stripping/cleaning, placing any desired sets and bends in the blade, doing any grinding or filing that may be needed. The stripping and cleaning is one of the most important steps in a successful wiring job: a thoroughly clean groove is essential to ensuring that the glue will hold, far more so than the type of glue used.
Stripping & Cleaning Wired Blades
If the blade being worked on is previously wired, the first step is obviously to remove the old wire and glue. Using an acetone bath (the least labor-intensive method) or a Dremel tool with a cut-off wheel (the fastest method) have been described above. If neither is available to you, then you have two options:
1) do it by hand, or 2) have a lackey do it by hand, while you give instructions, supervise, and sip on a bit of Laphroaig (also known as the “thesis advisor and graduate student” approach). Even if option 2 is the route you choose, you’ll still need to know what to do in order to give able, sage advice to your underling between nips of Islay malt.
Depending on the glue that was used for the old wire, it may be possible to strip the wire by simply grasping one loose end of it and pulling it firmly but smoothly out of the groove. If the glue is too strong at some point along the blade, however, the wire will break off. To help avoid this, you can “roll” the wire out of the groove using a pair of needle-nose pliers. Pinch one end of the wire in the pliers, with the pliers held perpendicular to the length of the blade, and then begin rolling the pliers along the blade. This will pull the wire from the groove, but because the wire will be rolled around radius of the pliers it will not have the same amount of stress on any one point and so will be less prone to breaking off. If the wire should break, you’ll need to use a utility knife or other blade to work it out. Ideally, you should be able to pry the broken end free and then continue pulling the wire out. Failing that, it’ll be necessary to gouge it out with the knife (a rather laborious task).
Once the wire is removed, it will still be necessary to clean the remaining bits of glue and insulation from the groove. Run your utility knife or a small screwdriver along the groove repeatedly until you only see bare metal. As noted above, this is of prime importance. The presence of old glue and residue will interfere with the adhesion of the new glue, making it more likely that the wire will pop out as the weapon is used. After stripping and cleaning the groove, remove any rust or grime from the surface of the blade with an abrading block or a Scotch-brite pad. The threading for the point may need to be cleaned as well- the Dremel wire-wheel bit is ideal for this, or else a small screwdriver can be used to scrape out the threads.
Cleaning New Blades
Even new blades may need cleaning. It’s not uncommon for blades to be shipped with a coating of oil or grease from the forge (copious amounts of grease in the case of one Eastern European forge). Grease left in the groove will guarantee that the glue will not hold. Inspect a new blade to verify that the surface and groove are clean. Even if the groove appears clear, run a screwdriver down it to make sure. If there is grease on the blade, first wipe the surface of the blade clean with a paper towel. If you have an acetone bath, you may try soaking the blade for a few hours, but I find that acetone is not especially effective in removing grease. A Dremel cut-off wheel will do the job quickly. To clear the grease from the groove by hand, tear a small piece off from a paper towel and fold it over a few times. Using a small screwdriver, press the folded bit of towel into the groove at the tip and then run it down the blade. Wipe away the grease that get pushed out of the groove. This step will typically need to be repeated a number of times, using a fresh piece of paper towel each time, to get the groove clean. The threading at the tang and tip should also be cleaned of any grease.
Mechanical Preparation (cutting, bending, filing, grinding)
Once the blade is clean, you want to take care of any mechanical preparation that may be needed. Cutting the tang to fit the grip, if required, is typically the first item to take care of, followed by bending the tang to the desired cant. The complete hilt (guard, socket, and grip) should be test assembled before wiring to ensure everything fits. It’s not uncommon for the tang to be to wide for the grip to fit over just below the shoulder of the blade. If this is the case, that part of the tang will need to be filed or ground so that the grip will fit.

The threading at the tip of the blade should be examined to ensure that it is in good shape and goes far enough down the blade (6-7 turns) for the barrel to screw on securely. The end of the blade groove should also be inspected—if it is too narrow or has any burrs, the wire can be damaged. A riffler file or grinding wheel can be used to widen the start of the groove if necessary. Lastly, it’s a good idea to pre-train a gentle downward curve into the blade. This will help ensure that the blade flexes evenly when a touch is delivered, reducing the chances of it taking kinks. The rules limits on curvature are 1 cm for epee for foil (editor’s note: the original article referenced a 2cm bend for foil, which was the case in 2004.)
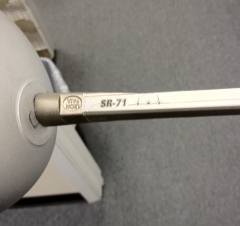
Point Parts
The last item to check are the point parts that will be used for the blade. The barrel, in particular, needs to be in good condition, since once it’s on it can’t be replaced without re-wiring the blade again. Closely inspect the barrel for any cracks, deformations, and dents that project into the interior wall of the barrel. A cracked barrel should be thrown out and replaced. An easy way to test for deformations is to insert a tip into the barrel and check that is slides smoothly up and down. An expanding mandrel is available for German-pattern foil and epee points, which may be able to repair a dented barrel (it will also work with French-pattern epee points). A 4.5-mm reamer can also be used to clear away dents in German foil barrels, but this removes metal and weakens the barrel, making it more appropriate as a ‘quick-fix’ for an already assembled weapon. A barrel that can’t be made completely smooth with the mandrel really should be replaced.
The barrel should be test-threaded onto the blade, to ensure that the threading at the base of the barrel is good. In the case of German and Leon Paul foil barrels, the tip screws should also be tested in the barrel, to check that the threads in the screw-holes are OK.
The condition of the tip is less critical, since it can be replaced after the blade is wired, but it’s still a good idea to make sure it’s good from the start. Check that the flange is securely attached to the end of the tip. The flanges on Prieur (French) made of soft bronze, peened on to the shaft, and are very prone to working loose. The end-flange of a German point is threaded on to the shaft of the tip, but once it comes unscrewed it will tend to work loose again even if you screw it back down. Also check the condition of the exposed plastic insulation on Prieur and Leon Paul tips—if damaged it can cause the weapon to ground out and not register a touch when the point is depressed.
Wiring the Blade
Once the blade is cleaned and prepared, and we know the point parts are in good condition, it’s time to proceed with the wiring itself. Gently unfold the new wire and straighten it with your fingers. With epee wires, take care not to get the two wires twisted around each other. It’s a good idea to inspect the point-end of the wire to verify that the insulating cup is undamaged, the solder or crimps are secure, and (for epee) that the two contacts are of even height. Also check along the length of the wire(s) to make sure the insulation is intact. Lastly, testing the wire with an Ohmmeter or continuity tester can save you a lot of wasted effort in the event you have a defective wire. You should see less than 1 ohm with a new, factory-made wire.
You may want to use a threadlocker to help prevent the barrel working loose in use. A hand-undoable formula (Loctite 242 “Blue” or equivalent) is what you want—the stronger formulations (e.g. Loctite “Red”) need to be heated in order to be undone. Apply a couple of drops to the end the blade, so that the threading is filled-in. The threadlocker will take some time to cure, so you won’t be rushed to get the barrel on.
Run just enough of the wire through the barrel so that about 2-3 cm of the end are sticking out the bottom. Doing this means that, if the wire gets caught and damaged as the barrel is screwed onto the blade, you only need to cut off that little bit at the end and try again. Thread the barrel on by hand, holding the end of the wire down in the groove. Once the barrel is hand-tight, use a pair of pliers to tighten it down further (you’ll want to either put the blade in a vise, or hold the blade in one pair of pliers while using another to turn the barrel). Tighten until you just start to feel resistance, and then go another ¼ to ½ turn. Over-tightening can crack a barrel, even one that’s new and in perfect condition (you’ll hear a characteristic ‘ting’ sound if this happens).

When the barrel is on tight, it’s time to draw the wire down through. Take hold of the end of the wire that you feed through the barrel prior to threading it on, and gently pull to bring the wire through. Pay close attention to where the wire emerges into the groove from the bottom of the barrel, and stop pulling if you feel any resistance, so as to avoid damaging the wire or insulation. Stop pulling when the contact base is just about to go into the barrel. Take the point-setter (or whatever substitute you’re using) in hand, and push the contact down into the barrel while pulling the wire through at the same time. Keep pushing until the contact is seated on the shoulder inside the barrel. You may want to inscribe the correct depth on your point-setter for future reference.
Once the barrel is on and the point is set, it’s time to bend the blade in the jig. The amount of bend should be about the same as one would see with a solid touch on an opponent. The purpose of the bend is to pre-tension the wire and reduce the likelihood of the wire or contact solder joint breaking when a touch is made. Too much bend, however, will make the wire prone to popping out of the groove when the blade is straight. Wrap a piece of tape around the tang just below the shoulder of the blade.

Applying Glue to the Blade
How you proceed from here is dependent on whether you are using a slow-curing cement or a cyanoacrylate glue. Cements are generally too thick to flow around a wire that is already laid in the groove. You will need to place the cement in the groove before the wire goes in (this is called bottom gluing).
With the wire held away, run a bead of glue down the length of the blade, completely filling the groove. Once the glue is in place, run the wire down into the groove, keeping it under gentle tension as you do so. The edge of a soft plastic dish scraper or a similar (non-metal) implement can be used to push the wire down into the groove without damaging the insulation.
Once the wire is laid down in the groove, maintain tension and secure it to the tang with another piece of tape on top of the piece already wrapped around the tang. To prevent the loose end of the wire from getting in the way or being damaged, wrap it around the tang and tape it down. You may also wish to top glue the blade as well, running another bead of cement down the blade after the wire is in place, to ensure that it will be completely surrounded by glue in the groove.
When done, use a paper towel to wipe away any excess glue on the surface of the blade. Leave the blade in the jig until the glue has fully cured—overnight is a safe bet on curing time.
Cyanoacrylates cure far too quickly for bottom gluing to be workable, but their lower viscosity allows them to flow down around the wire and fill the groove.
Particularly when using the super-thin, instant cure CAs, care needs to be taken to ensure that the glue doesn’t run into the point or bond the wrapped-up wire end to the tang. To glue a blade using CAs, Lay the wire in the groove of the bent blade, applying tension to ensure it fits tautly down in the groove, and tape the end of the wire down as described above. Tilt the blade so the point is elevated, and apply glue starting just below the barrel, going down about 15 cm (for thin CAs, just a few drops will easily run down this far). Then invert the blade and hold it upside down for 15-20 seconds or so.
Inverting the blade ensures that any excess glue will collect at the middle of the blade instead of running all the way down to the tang. Once the first application of glue has set, hold the blade groove-up again, this time with the tang elevated. Now run glue 15-20 cm down from just below the tang (if the blade groove has an indentation to allow insulation tubing to run through the guard, leave that clear). Once again, invert the blade and wait 15-20 seconds for the glue to cure. Repeat the process for gluing the rest of the groove.
A blade wired with an instant-cure CA may be assembled immediately, but I usually prefer to leave the blade for at least a few minutes to allow the glue to thoroughly cure. Still, you can see a chief advantage of CAs: the blade can be wired and the weapon built in one sitting.
Assembling the Weapon
Once the glue has cured, the blade is ready to be mated to the hilt and point components to build the complete weapon. Remove the blade from the jig and inspect the groove to make sure that the wire is fully glued down. Any excess dried glue can be scraped away with a knife. Untape and unwrap the end of the wire from the tang. If you managed to glue part of the wire to the tang (among experienced armorers, there are those who admit to having done this at least a couple of times, and there are liars), gelled super-glue remover is ideal for freeing the wire.
Straighten the wire-end, and then slide the plastic insulation tubing on over it. Ideally, the blade groove has a wider, deeper indent just beyond the shoulder of the blade. This allows the tubing to pass through the guard, and provide some extra protection for the wire in case it gets pinched passing through the guard. Now slide the guard on over the tang and wire. There should be a notch in the opening of the guard, which is there to allow the wire to pass through without getting pinched and damaged. If the notch is too small (or not present at all), a round riffler file can be used to expand it. Once the guard is on, slide the socket on over the tang and wire, making sure that the wire does not get pinched between the socket and the inside of the guard.
The grip and pad go on last. Just as with the guard opening, there should be a notch on the upper front end of the grip to let the wire pass through without getting squashed. If that notch is too small, enlarge it with a round file. The pad fits between the socket and the grip. I prefer to enlarge the hole of the pad so that it can be slid up over the front of the grip. This allows you to readily check if the wire is not properly running through the notch when the grip is tightened. The pad can be slid down into place when the grip is on. When the grip is in place and the wire is safely in the notch, thread the pommel nut onto the tang and tighten down the grip, checking as you do so that the wire is not getting shifted and pinched. You may want to slide on a lock-washer before putting the nut on. If you need to use several washers because the nut doesn’t bottom-out firmly on the grip, you really should cut the tang shorter or cut threading further down the tang.
Attaching the Wire to the Socket
Once the grip is tightened down, it’s time attach the wire to the socket. Some prefer to attach the wire before mounting the grip, since it’s easier to get at the set screws or nuts. This certainly can work, but I prefer to have the socket held down securely for the task– the right tools will allow you to get around the tight angles. Clip off the excess wire so there is just about 3 cm or so beyond the end of the tubing. Strip the insulation off of the wire end—the 30-gauge strippers mentioned in the Recommended Tools section are perfect for this. If you don’t have a small enough wire stripper, the cloth insulation can be unwrapped by hand and clipped away (there are typically two layers, wrapped in opposite directions), or removed with sandpaper. German wires have a layer of varnish on the wire itself that must be removed with emery paper—otherwise it will act as an insulator. Some people like to use a match or lighter to burn away the insulation, but this can make the wire brittle and prone to breaking at the socket.
For 2-prong foil sockets, the wire is attached to the B-line terminal (the on for the narrower pin). German-style 2-prong sockets have a hole that lets you run the wire up from beneath, which makes it easier to put in place. Bent-nose pliers or an angled ignition wrench will make getting at the nut beneath the bracket easier. On bayonet sockets, the B-line is the screw at the side. For epee sockets, the wires run to the A and B terminals, which are the two closest to each other. It doesn’t matter which wire goes to A or B on an epee. Wrap the stripped wire around the terminal in the direction that it turns to tighten (bent-nose tweezers or a small hemostat help with this). Leaving some extra wire beyond the terminal will allow you to hold it in place while tightening. The insulation tubing needs to run all the way to the terminal. It’s useful to allow a bit of the insulation tubing to be pinched under the terminal when it is tight– this will provide some strain relief for the wire and make it less likely to break at the socket. When done, clip off any excess wire.
Assemble the point, and you’re ready to test the weapon. While an LED tester will do to tell you if the completed weapon is working or not, an Ohmmeter is better because it will let you know about any problems that aren’t quite serious enough to make the weapon malfunction yet, but probably will before too long. The legal limit for electrical resistance in both foils and epees is 2 ohms. For foils, this means 2-ohms when the point is up, and for epees 2-ohms when the point is depressed. Anything above this means something is at least a little bit wrong. The first thing to check for is dirty point parts. Clean the tip and point, and gently sand the ends of the foil spring or epee contact spring with emery paper to remove dirt & corrosion. If you used a German wire, make sure you completely removed the varnish from the stripped end.
If the resistance is OK, test the point with your weight and shims, and make any adjustments as needed. For foils, insulate approximately the first 15 cm from the point with tape. When taping a foil, it’s best to run a piece of tape lengthwise down from just the bottom of the barrel, and then wrap a second piece just around the barrel—you’ll be able to take the point apart for cleaning and maintenance. With German point, having a narrow bit of tape running just around the screws beneath the outer piece of tape can provide a little bit of extra protection for the screw-heads.
The weapon is now ready for use. While there are no guarantees, a well-done wiring-job, on a properly prepared blade, using a barrel in good shape, should hold up for quite some time. If you find you are having problems with wires popping out of the groove, the most likely culprit is the groove not being thoroughly clean before gluing. You may also not be adequately tensioning the wire and seating it in the groove. If the wire breaks at the point contact too frequently, it may be because you aren’t sufficiently bending the blade to pre-tension the wire, although your fencing style and that of your opponents may be a more significant factor.
The first time you wire a blade, you may find yourself taking up to an hour or more to do the task. As you gain confidence, this time will shorten considerably. Starting with a clean, prepared blade and using instant-curing CA glue, an experienced armorer can have a weapon wired and built in under 15 minutes. Most importantly, by doing the task yourself you won’t have to wait for someone else to find time to do it, and will probably be more diligent and careful since it’s your own gear you’re working on. And then you can get back to those Stargate episodes secure in the knowledge that your weapon is done right and set up just the way you want it.